Coursera
A/B testing, traffic shifting and autoscaling
Introduction
In this lab you will create an endpoint with multiple variants, splitting the traffic between them. Then after testing and reviewing the endpoint performance metrics, you will shift the traffic to one variant and configure it to autoscale.
Table of Contents
- 1. Create an endpoint with multiple variants
- 2. Test model
- 3. Shift the traffic to one variant and review the endpoint performance metrics
- 4. Configure one variant to autoscale
Let’s install and import the required modules.
# please ignore warning messages during the installation
!pip install --disable-pip-version-check -q sagemaker==2.35.0
!conda install -q -y pytorch==1.6.0 -c pytorch
!pip install --disable-pip-version-check -q transformers==3.5.1
!pip install -q protobuf==3.20.*
[33mDEPRECATION: pyodbc 4.0.0-unsupported has a non-standard version number. pip 23.3 will enforce this behaviour change. A possible replacement is to upgrade to a newer version of pyodbc or contact the author to suggest that they release a version with a conforming version number. Discussion can be found at https://github.com/pypa/pip/issues/12063[0m[33m
[0m[33mWARNING: Running pip as the 'root' user can result in broken permissions and conflicting behaviour with the system package manager. It is recommended to use a virtual environment instead: https://pip.pypa.io/warnings/venv[0m[33m
[0mCollecting package metadata (current_repodata.json): ...working... done
Solving environment: ...working... done
# All requested packages already installed.
Retrieving notices: ...working... done
[33mDEPRECATION: pyodbc 4.0.0-unsupported has a non-standard version number. pip 23.3 will enforce this behaviour change. A possible replacement is to upgrade to a newer version of pyodbc or contact the author to suggest that they release a version with a conforming version number. Discussion can be found at https://github.com/pypa/pip/issues/12063[0m[33m
[0m[33mWARNING: Running pip as the 'root' user can result in broken permissions and conflicting behaviour with the system package manager. It is recommended to use a virtual environment instead: https://pip.pypa.io/warnings/venv[0m[33m
[0m[33mDEPRECATION: pyodbc 4.0.0-unsupported has a non-standard version number. pip 23.3 will enforce this behaviour change. A possible replacement is to upgrade to a newer version of pyodbc or contact the author to suggest that they release a version with a conforming version number. Discussion can be found at https://github.com/pypa/pip/issues/12063[0m[33m
[0m[33mWARNING: Running pip as the 'root' user can result in broken permissions and conflicting behaviour with the system package manager. It is recommended to use a virtual environment instead: https://pip.pypa.io/warnings/venv[0m[33m
[0m
[1m[[0m[34;49mnotice[0m[1;39;49m][0m[39;49m A new release of pip is available: [0m[31;49m23.2.1[0m[39;49m -> [0m[32;49m23.3.1[0m
[1m[[0m[34;49mnotice[0m[1;39;49m][0m[39;49m To update, run: [0m[32;49mpip install --upgrade pip[0m
import matplotlib.pyplot as plt
%matplotlib inline
%config InlineBackend.figure_format='retina'
import boto3
import sagemaker
import pandas as pd
import botocore

config = botocore.config.Config(user_agent_extra='dlai-pds/c3/w2')

# low-level service client of the boto3 session
sm = boto3.client(service_name='sagemaker',
                  config=config)

sm_runtime = boto3.client('sagemaker-runtime',
                          config=config)

sess = sagemaker.Session(sagemaker_client=sm,
                         sagemaker_runtime_client=sm_runtime)

bucket = sess.default_bucket()
role = sagemaker.get_execution_role()
region = sess.boto_region_name

cw = boto3.client(service_name='cloudwatch',
                  config=config)

autoscale = boto3.client(service_name="application-autoscaling",
                         config=config)
/opt/conda/lib/python3.7/site-packages/boto3/compat.py:82: PythonDeprecationWarning: Boto3 will no longer support Python 3.7 starting December 13, 2023. To continue receiving service updates, bug fixes, and security updates please upgrade to Python 3.8 or later. More information can be found here: https://aws.amazon.com/blogs/developer/python-support-policy-updates-for-aws-sdks-and-tools/
  warnings.warn(warning, PythonDeprecationWarning)
1. Create an endpoint with multiple variants
Two models trained to analyze customer feedback and classify the messages into positive (1), neutral (0), and negative (-1) sentiments are saved in the following S3 bucket paths. These tar.gz files contain the model artifacts, which result from model training.
model_a_s3_uri = 's3://dlai-practical-data-science/models/ab/variant_a/model.tar.gz'
model_b_s3_uri = 's3://dlai-practical-data-science/models/ab/variant_b/model.tar.gz'
Let’s deploy an endpoint splitting the traffic between these two models 50/50 to perform A/B Testing. Instead of creating a PyTorch Model object and calling model.deploy() function, you will create an Endpoint configuration with multiple model variants. Here is the workflow you will follow to create an endpoint:

1.1. Construct Docker Image URI

You will need to create the models in Amazon SageMaker, which retrieves the URI for the pre-built SageMaker Docker image stored in Amazon Elastic Container Re
gistry (ECR). Let’s construct the ECR URI which you will pass into the create_model function later.
Set the instance type. For the purposes of this lab, you will use a relatively small instance. Please refer to this link for additional instance types that may work for your use cases outside of this lab.
inference_instance_type = 'ml.m5.large'
Exercise 1
Create an ECR URI using the 'pytorch' framework. Review other parameters of the image.
inference_image_uri = sagemaker.image_uris.retrieve(
    ### BEGIN SOLUTION - DO NOT delete this comment for grading purposes
    framework="pytorch",
    ### END SOLUTION - DO NOT delete this comment for grading purposes
    version='1.6.0',
    instance_type=inference_instance_type,
    region=region,
    py_version='py3',
    image_scope='inference'
)
print(inference_image_uri)
763104351884.dkr.ecr.us-east-1.amazonaws.com/pytorch-inference:1.6.0-cpu-py3
1.2. Create Amazon SageMaker Models

Amazon SageMaker Model includes information such as the S3 location of the model, the container image that can be used for inference with that model, the execution role, and the model name.
Let’s construct the model names.
import time
from pprint import pprint

timestamp = int(time.time())

model_name_a = '{}-{}'.format('a', timestamp)
model_name_b = '{}-{}'.format('b', timestamp)
You will use the following function to check if the model already exists in Amazon SageMaker.
def check_model_existence(model_name):
    for model in sm.list_models()['Models']:
        if model_name == model['ModelName']:
            return True
    return False
Exercise 2
Create an Amazon SageMaker Model based on the model_a_s3_uri data.
Instructions: Use sm.create_model function, which requires the model name, Amazon SageMaker execution role and a primary container description (PrimaryContainer dictionary). The PrimaryContainer includes the S3 bucket location of the model artifacts (ModelDataUrl key) and ECR URI (Image key).
if not check_model_existence(model_name_a):
    model_a = sm.create_model(
        ModelName=model_name_a,
        ExecutionRoleArn=role,
        PrimaryContainer={
            ### BEGIN SOLUTION - DO NOT delete this comment for grading purposes
            'ModelDataUrl': model_a_s3_uri,
            'Image': inference_image_uri
            ### END SOLUTION - DO NOT delete this comment for grading purposes
        }
    )
    pprint(model_a)
else:
    print("Model {} already exists".format(model_name_a))
{'ModelArn': 'arn:aws:sagemaker:us-east-1:227784438944:model/a-1698160602',
 'ResponseMetadata': {'HTTPHeaders': {'content-length': '74',
                                      'content-type': 'application/x-amz-json-1.1',
                                      'date': 'Tue, 24 Oct 2023 15:16:43 GMT',
                                      'x-amzn-requestid': '1c1d92ab-2507-47b1-b120-4c117404391b'},
                      'HTTPStatusCode': 200,
                      'RequestId': '1c1d92ab-2507-47b1-b120-4c117404391b',
                      'RetryAttempts': 0}}
Exercise 3
Create an Amazon SageMaker Model based on the model_b_s3_uri data.
Instructions: Use the example in the cell above.
if not check_model_existence(model_name_b):
    model_b = sm.create_model(
        ### BEGIN SOLUTION - DO NOT delete this comment for grading purposes
        ModelName=model_name_b,
        ExecutionRoleArn=role,
        ### END SOLUTION - DO NOT delete this comment for grading purposes
        PrimaryContainer={
            'ModelDataUrl': model_b_s3_uri,
            'Image': inference_image_uri
        }
    )
    pprint(model_b)
else:
    print("Model {} already exists".format(model_name_b))
{'ModelArn': 'arn:aws:sagemaker:us-east-1:227784438944:model/b-1698160602',
 'ResponseMetadata': {'HTTPHeaders': {'content-length': '74',
                                      'content-type': 'application/x-amz-json-1.1',
                                      'date': 'Tue, 24 Oct 2023 15:16:44 GMT',
                                      'x-amzn-requestid': 'dba1a8bb-9f6e-4f43-88b5-ff543fd4b672'},
                      'HTTPStatusCode': 200,
                      'RequestId': 'dba1a8bb-9f6e-4f43-88b5-ff543fd4b672',
                      'RetryAttempts': 1}}
1.3. Set up Amazon SageMaker production variants

A production variant is a packaged SageMaker Model combined with the configuration related to how that model will be hosted.
You have constructed the model in the section above. The hosting resources configuration includes information on how you want that model to be hosted: the number and type of instances, a pointer to the SageMaker package model, as well as a variant name and variant weight. A single SageMaker Endpoint can actually include multiple production variants.
Exercise 4
Create an Amazon SageMaker production variant for the SageMaker Model with the model_name_a.
Instructions: Use the production_variant function passing the model_name_a and instance type defined above.
variantA = production_variant(
    model_name=..., # SageMaker Model name
    instance_type=..., # instance type
    initial_weight=50, # traffic distribution weight
    initial_instance_count=1, # instance count
    variant_name='VariantA', # production variant name
)
from sagemaker.session import production_variant

variantA = production_variant(
    ### BEGIN SOLUTION - DO NOT delete this comment for grading purposes
    model_name=model_name_a,
    instance_type=inference_instance_type,
    ### END SOLUTION - DO NOT delete this comment for grading purposes
    initial_weight=50,
    initial_instance_count=1,
    variant_name='VariantA',
)
print(variantA)
{'ModelName': 'a-1698160602', 'InstanceType': 'ml.m5.large', 'InitialInstanceCount': 1, 'VariantName': 'VariantA', 'InitialVariantWeight': 50}
Exercise 5
Create an Amazon SageMaker production variant for the SageMaker Model with the model_name_b.
Instructions: See the required arguments in the cell above.
variantB = production_variant(
    ### BEGIN SOLUTION - DO NOT delete this comment for grading purposes
    model_name=model_name_b,
    instance_type=inference_instance_type,
    initial_weight=50,
    ### END SOLUTION - DO NOT delete this comment for grading purposes
    initial_instance_count=1,
    variant_name='VariantB'
)
print(variantB)
{'ModelName': 'b-1698160602', 'InstanceType': 'ml.m5.large', 'InitialInstanceCount': 1, 'VariantName': 'VariantB', 'InitialVariantWeight': 50}
1.4. Configure and create the endpoint

You will use the following functions to check if the endpoint configuration and endpoint itself already exist in Amazon SageMaker.
def check_endpoint_config_existence(endpoint_config_name):
    for endpoint_config in sm.list_endpoint_configs()['EndpointConfigs']:
        if endpoint_config_name == endpoint_config['EndpointConfigName']:
            return True
    return False

def check_endpoint_existence(endpoint_name):
    for endpoint in sm.list_endpoints()['Endpoints']:
        if endpoint_name == endpoint['EndpointName']:
            return True
    return False
Create the endpoint configuration by specifying the name and pointing to the two production variants that you just configured that tell SageMaker how you want to host those models.
endpoint_config_name = '{}-{}'.format('ab', timestamp)

if not check_endpoint_config_existence(endpoint_config_name):
    endpoint_config = sm.create_endpoint_config(
        EndpointConfigName=endpoint_config_name,
        ProductionVariants=[variantA, variantB]
    )
    pprint(endpoint_config)
else:
    print("Endpoint configuration {} already exists".format(endpoint_config_name))
{'EndpointConfigArn': 'arn:aws:sagemaker:us-east-1:227784438944:endpoint-config/ab-1698160602',
 'ResponseMetadata': {'HTTPHeaders': {'content-length': '94',
                                      'content-type': 'application/x-amz-json-1.1',
                                      'date': 'Tue, 24 Oct 2023 15:16:45 GMT',
                                      'x-amzn-requestid': '77abdc5a-62c0-4d47-9230-4bd762e2b0c6'},
                      'HTTPStatusCode': 200,
                      'RequestId': '77abdc5a-62c0-4d47-9230-4bd762e2b0c6',
                      'RetryAttempts': 0}}

Construct the endpoint name.
model_ab_endpoint_name = '{}-{}'.format('ab', timestamp)
print('Endpoint name: {}'.format(model_ab_endpoint_name))
Endpoint name: ab-1698160602
Exercise 6
Create an endpoint with the endpoint name and configuration defined above.
if not check_endpoint_existence(model_ab_endpoint_name):
    endpoint_response = sm.create_endpoint(
        ### BEGIN SOLUTION - DO NOT delete this comment for grading purposes
        EndpointName=model_ab_endpoint_name,
        EndpointConfigName=endpoint_config_name
        ### END SOLUTION - DO NOT delete this comment for grading purposes
    )
    print('Creating endpoint {}'.format(model_ab_endpoint_name))
    pprint(endpoint_response)
else:
    print("Endpoint {} already exists".format(model_ab_endpoint_name))
Creating endpoint ab-1698160602
{'EndpointArn': 'arn:aws:sagemaker:us-east-1:227784438944:endpoint/ab-1698160602',
 'ResponseMetadata': {'HTTPHeaders': {'content-length': '81',
                                      'content-type': 'application/x-amz-json-1.1',
                                      'date': 'Tue, 24 Oct 2023 15:16:45 GMT',
                                      'x-amzn-requestid': '0725dc26-99d5-453b-a5b0-719bf6445dee'},
                      'HTTPStatusCode': 200,
                      'RequestId': '0725dc26-99d5-453b-a5b0-719bf6445dee',
                      'RetryAttempts': 0}}
Review the created endpoint configuration in the AWS console.
Instructions:
- open the link
- notice that you are in the section Amazon SageMaker -> Endpoint configuration
- check the name of the endpoint configuration, its Amazon Resource Name (ARN) and production variants
- click on the production variants and check their container information: image and model data location
from IPython.core.display import display, HTML

display(
    HTML(
        '<b>Review <a target="blank" href="https://console.aws.amazon.com/sagemaker/home?region={}#/endpointConfig/{}">REST Endpoint configuration</a></b>'.format(
            region, endpoint_config_name
        )
    )
)
Review REST Endpoint configuration
Review the created endpoint in the AWS console.
Instructions:
- open the link
- notice that you are in the section Amazon SageMaker -> Endpoints
- check the name of the endpoint, its ARN and status
- below you can review the monitoring metrics such as CPU, memory and disk utilization. Further down you can see the endpoint configuration settings with its production variants
from IPython.core.display import display, HTML

display(HTML('<b>Review <a target="blank" href="https://console.aws.amazon.com/sagemaker/home?region={}#/endpoints/{}">SageMaker REST endpoint</a></b>'.format(region, model_ab_endpoint_name)))
Review SageMaker REST endpoint
Wait for the endpoint to deploy.
This cell will take approximately 5-10 minutes to run.
%%time

waiter = sm.get_waiter('endpoint_in_service')
waiter.wait(EndpointName=model_ab_endpoint_name)
CPU times: user 55 ms, sys: 16 ms, total: 71 ms
Wall time: 5min 1s
Wait until the ^^ endpoint ^^ is deployed
2. Test model
2.1. Test the model on a few sample strings
Here, you will pass sample strings of text to the endpoint in order to see the sentiment. You are given one example of each, however, feel free to play around and change the strings yourself!
Exercise 7
Create an Amazon SageMaker Predictor based on the deployed endpoint.
Instructions: Use the Predictor object with the following parameters. Please pass JSON serializer and deserializer objects here, calling them with the functions JSONLinesSerializer() and JSONLinesDeserializer(), respectively. More information about the serializers can be found here.
predictor = Predictor(
    endpoint_name=..., # endpoint name
    serializer=..., # a serializer object, used to encode data for an inference endpoint
    deserializer=..., # a deserializer object, used to decode data from an inference endpoint
    sagemaker_session=sess
)
from sagemaker.predictor import Predictor
from sagemaker.serializers import JSONLinesSerializer
from sagemaker.deserializers import JSONLinesDeserializer

inputs = [
    {"features": ["I love this product!"]},
    {"features": ["OK, but not great."]},
    {"features": ["This is not the right product."]},
]

predictor = Predictor(
    ### BEGIN SOLUTION - DO NOT delete this comment for grading purposes
    endpoint_name=model_ab_endpoint_name,
    serializer=JSONLinesSerializer(),
    deserializer=JSONLinesDeserializer(),
    ### END SOLUTION - DO NOT delete this comment for grading purposes
    sagemaker_session=sess
)

predicted_classes = predictor.predict(inputs)

for predicted_class in predicted_classes:
    print("Predicted class {} with probability {}".format(predicted_class['predicted_label'], predicted_class['probability']))
Predicted class 1 with probability 0.9605445861816406
Predicted class 0 with probability 0.5798221230506897
Predicted class -1 with probability 0.7667604684829712
2.2. Generate traffic and review the endpoint performance metrics
Now you will generate traffic. To analyze the endpoint performance you will review some of the metrics that Amazon SageMaker emits in CloudWatch: CPU Utilization, Latency and Invocations. Full list of namespaces and metrics can be found here. CloudWatch get_metric_statistics documentation can be found here.
But before that, let’s create a function that will help to extract the results from CloudWatch and plot them.
def plot_endpoint_metrics_for_variants(endpoint_name,
                                       namespace_name,
                                       metric_name,
                                       variant_names,
                                       start_time,
                                       end_time):

    try:
        joint_variant_metrics = None

        for variant_name in variant_names:
            metrics = cw.get_metric_statistics( # extracts the results in a dictionary format
                Namespace=namespace_name, # the namespace of the metric, e.g. "AWS/SageMaker"
                MetricName=metric_name, # the name of the metric, e.g. "CPUUtilization"
                StartTime=start_time, # the time stamp that determines the first data point to return
                EndTime=end_time, # the time stamp that determines the last data point to return
                Period=60, # the granularity, in seconds, of the returned data points
                Statistics=["Sum"], # the metric statistics
                Dimensions=[ # dimensions, as CloudWatch treats each unique combination of dimensions as a separate metric
                    {"Name": "EndpointName", "Value": endpoint_name},
                    {"Name": "VariantName", "Value": variant_name}
                ],
            )

            if metrics["Datapoints"]: # access the results from the distionary using the key "Datapoints"
                df_metrics = pd.DataFrame(metrics["Datapoints"]) \
                    .sort_values("Timestamp") \
                    .set_index("Timestamp") \
                    .drop("Unit", axis=1) \
                    .rename(columns={"Sum": variant_name}) # rename the column with the metric results as a variant_name

                if joint_variant_metrics is None:
                    joint_variant_metrics = df_metrics
                else:
                    joint_variant_metrics = joint_variant_metrics.join(df_metrics, how="outer")

        joint_variant_metrics.plot(title=metric_name)
    except:
        pass
Establish wide enough time bounds to show all the charts using the same timeframe:
from datetime import datetime, timedelta

start_time = datetime.now() - timedelta(minutes=30)
end_time = datetime.now() + timedelta(minutes=30)

print('Start Time: {}'.format(start_time))
print('End Time: {}'.format(end_time))
Start Time: 2023-10-24 14:51:49.868626
End Time: 2023-10-24 15:51:49.868673
Set the list of the the variant names to analyze.
variant_names = [variantA["VariantName"], variantB["VariantName"]]

print(variant_names)
['VariantA', 'VariantB']
Run some predictions and view the metrics for each variant.
This cell will take approximately 1-2 minutes to run.
%%time

for i in range(0, 100):
    predicted_classes = predictor.predict(inputs)
CPU times: user 267 ms, sys: 5 ms, total: 272 ms
Wall time: 1min 35s
Μake sure the predictions ^^ above ^^ ran successfully
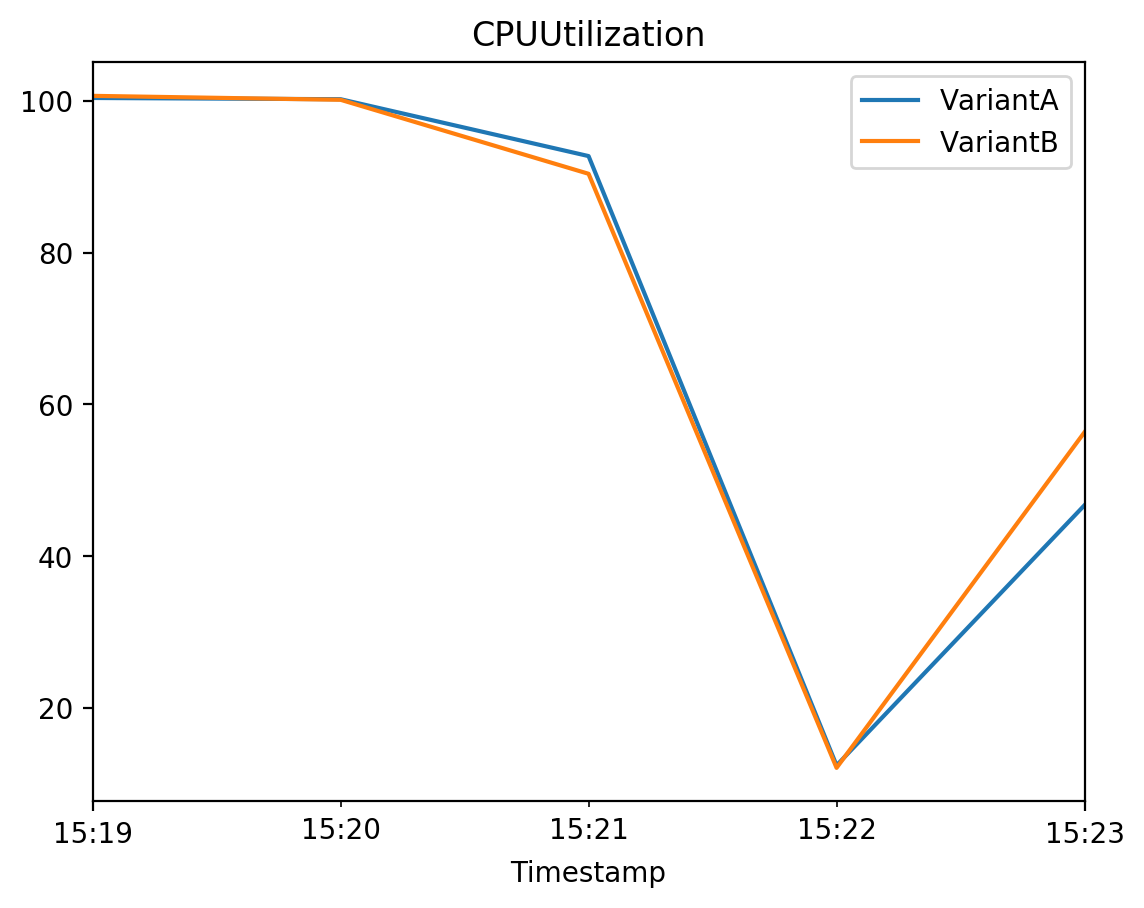
Let’s query CloudWatch to get a few metrics that are split across variants. If you see Metrics not yet available, please be patient as metrics may take a few mins to appear in CloudWatch.
time.sleep(30) # Sleep to accomodate a slight delay in metrics gathering
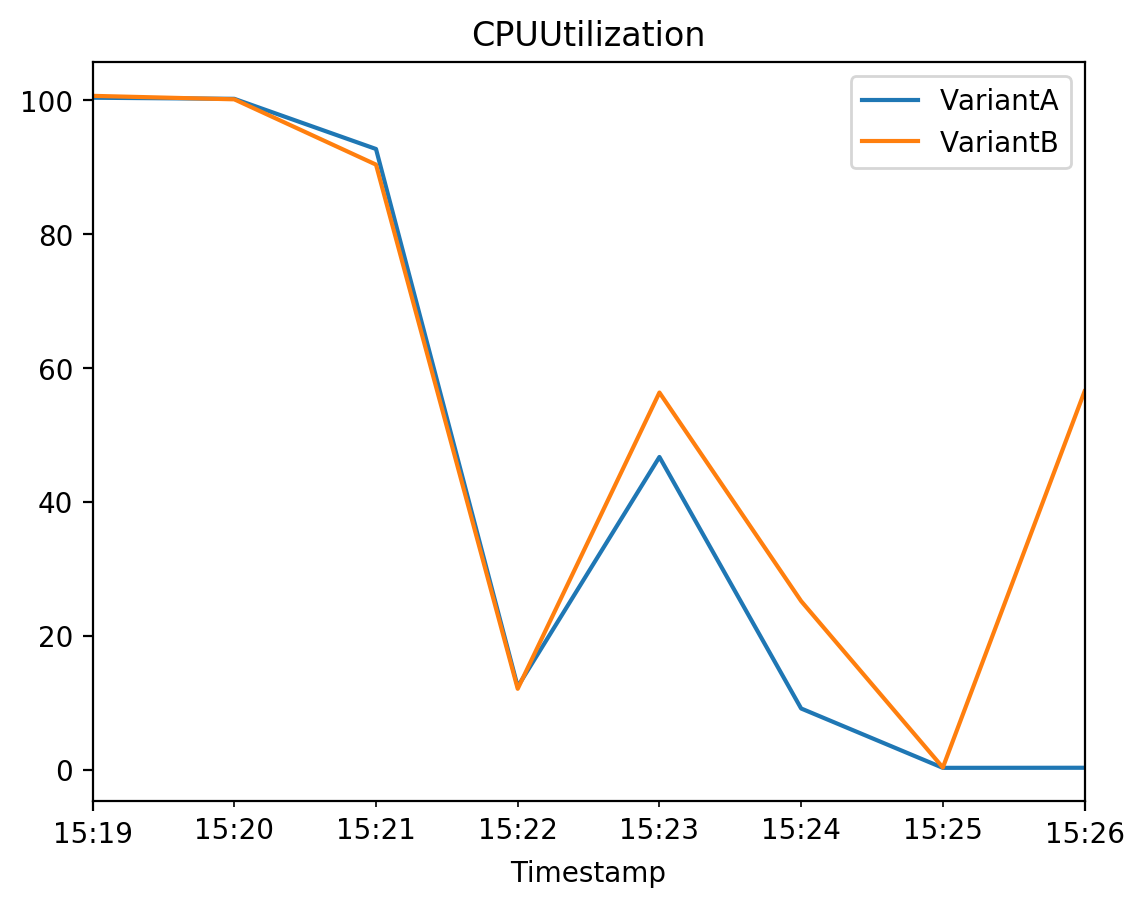
# CPUUtilization
# The sum of each individual CPU core's utilization.
# The CPU utilization of each core can range between 0 and 100. For example, if there are four CPUs, CPUUtilization can range from 0% to 400%.
plot_endpoint_metrics_for_variants(
    endpoint_name=model_ab_endpoint_name,
    namespace_name="/aws/sagemaker/Endpoints",
    metric_name="CPUUtilization",
    variant_names=variant_names,
    start_time=start_time,
    end_time=end_time
)
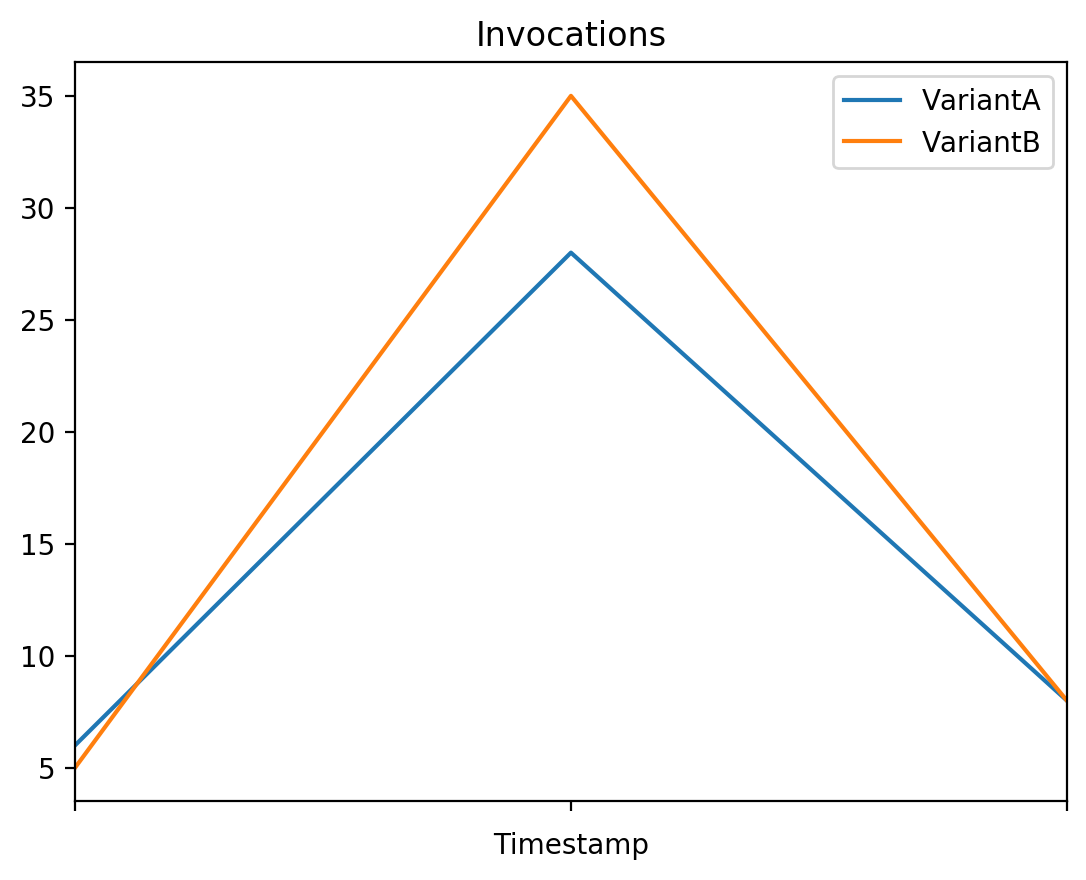
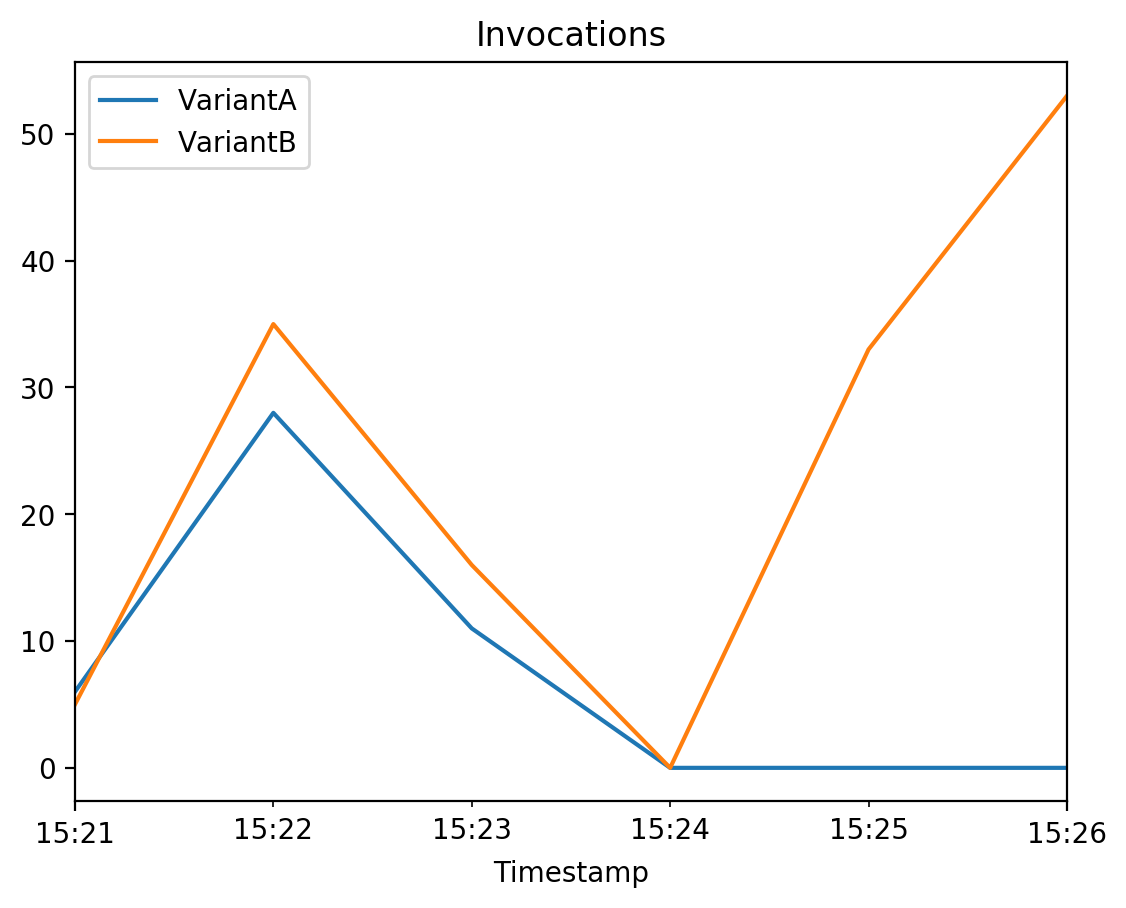
# Invocations
# The number of requests sent to a model endpoint.
plot_endpoint_metrics_for_variants(
    endpoint_name=model_ab_endpoint_name,
    namespace_name="AWS/SageMaker",
    metric_name="Invocations",
    variant_names=variant_names,
    start_time=start_time,
    end_time=end_time
)
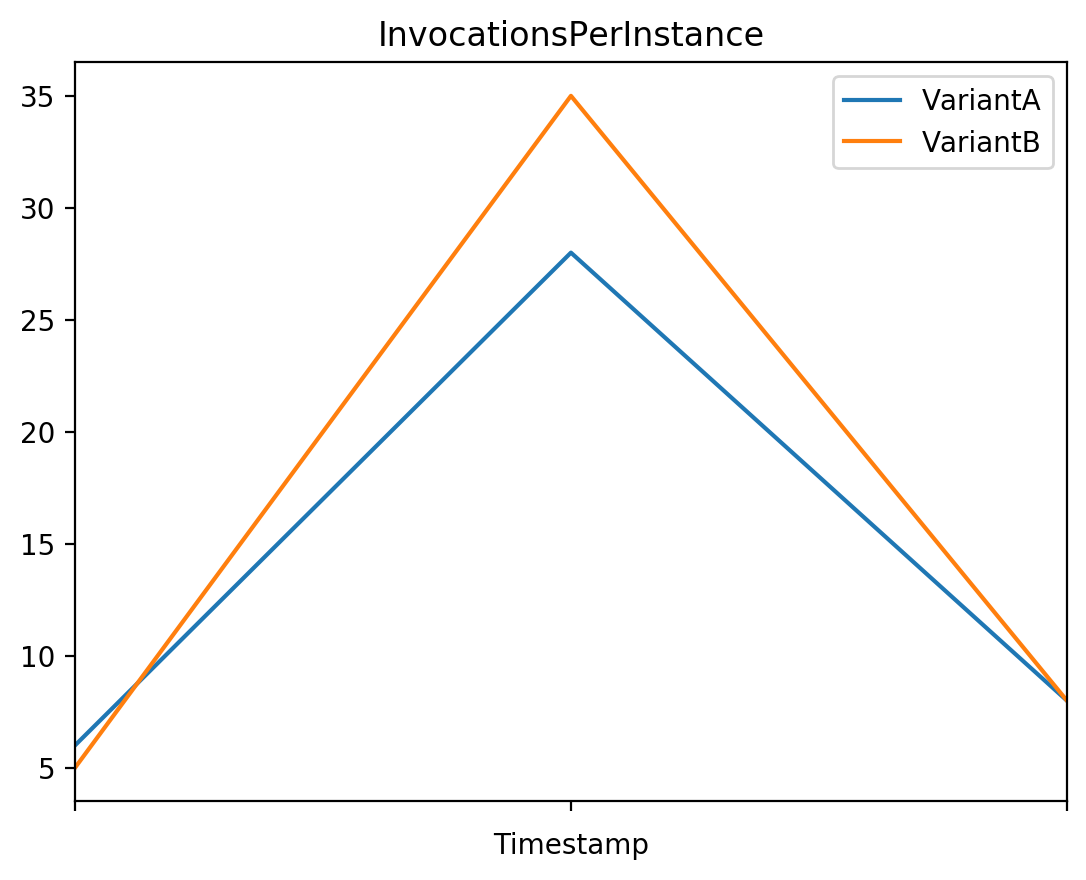
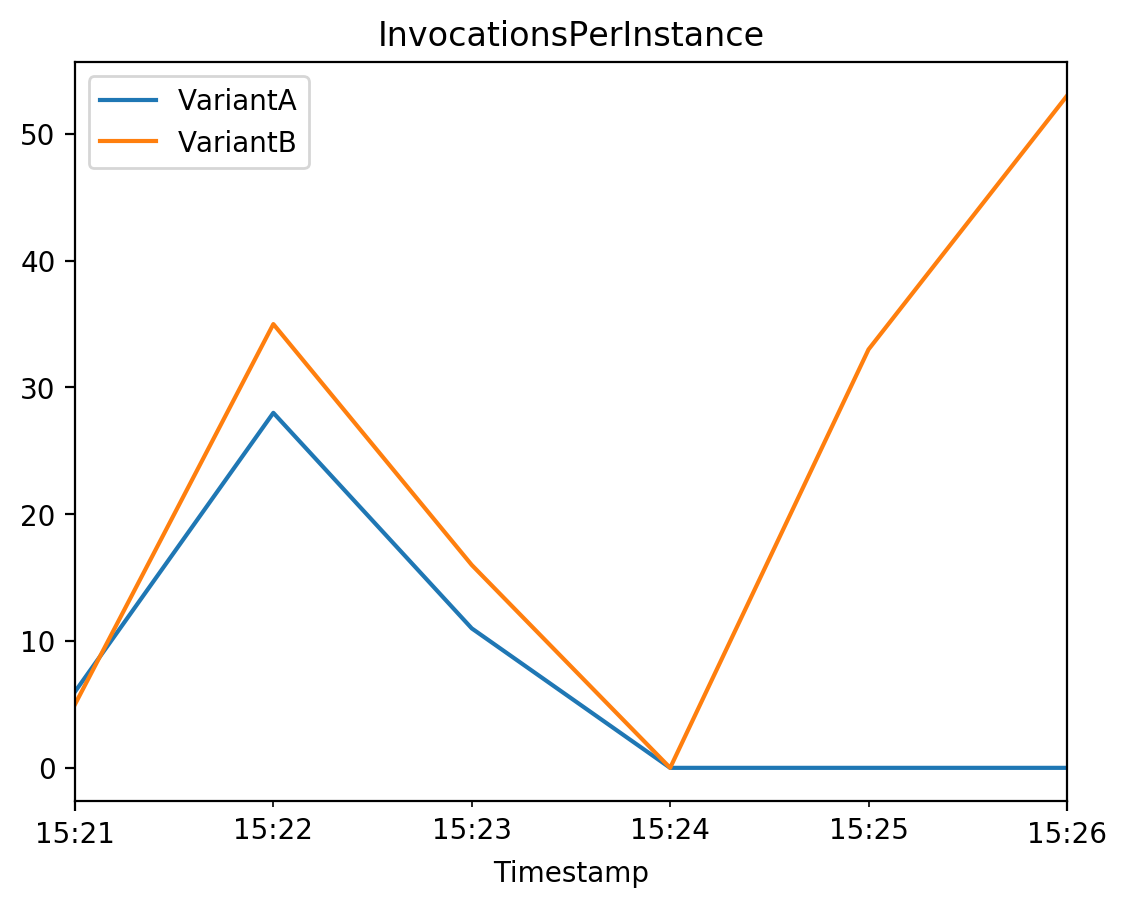
# InvocationsPerInstance
# The number of invocations sent to a model, normalized by InstanceCount in each production variant.
plot_endpoint_metrics_for_variants(
    endpoint_name=model_ab_endpoint_name,
    namespace_name="AWS/SageMaker",
    metric_name="InvocationsPerInstance",
    variant_names=variant_names,
    start_time=start_time,
    end_time=end_time
)
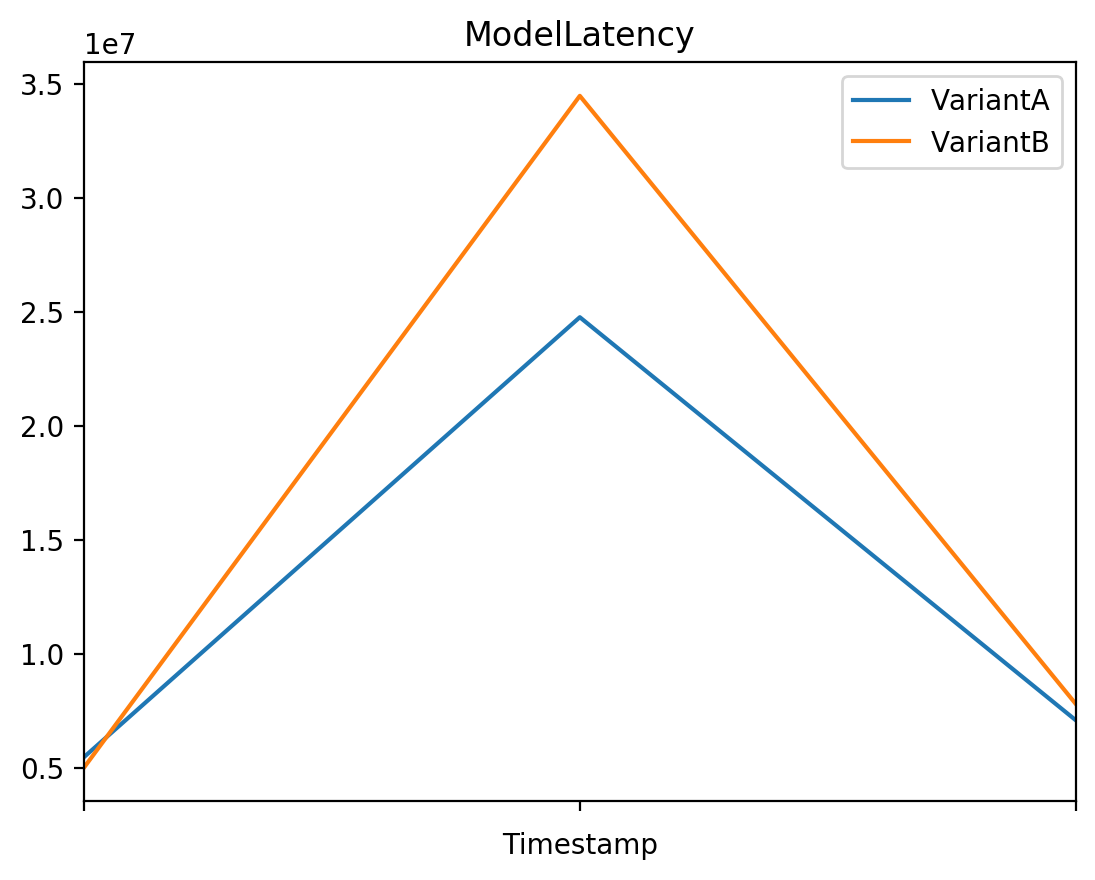
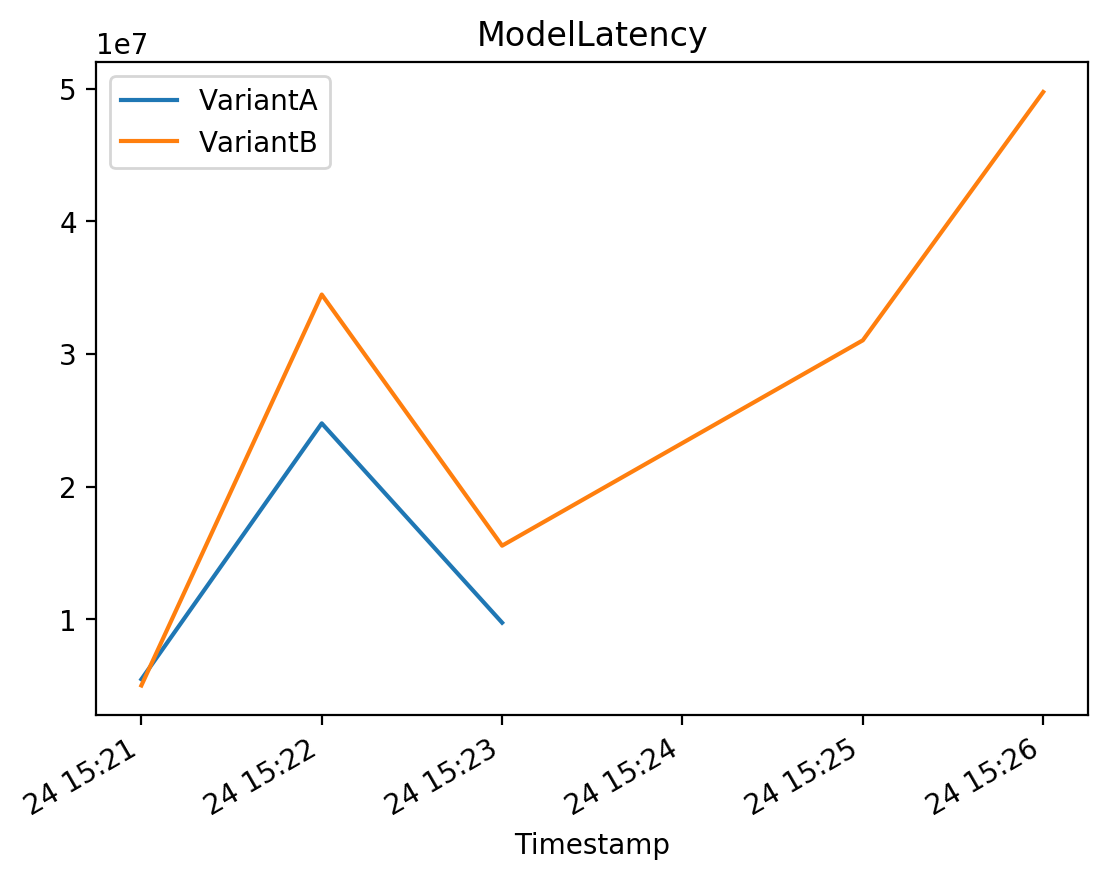
# ModelLatency
# The interval of time taken by a model to respond as viewed from SageMaker (in microseconds).
plot_endpoint_metrics_for_variants(
    endpoint_name=model_ab_endpoint_name,
    namespace_name="AWS/SageMaker",
    metric_name="ModelLatency",
    variant_names=variant_names,
    start_time=start_time,
    end_time=end_time
)
3. Shift the traffic to one variant and review the endpoint performance metrics
Generally, the winning model would need to be chosen. The decision would be made based on the endpoint performance metrics and some other business related evaluations. Here you can assume that the winning model is in the Variant B and shift all traffic to it.
Construct a list with the updated endpoint weights.
No downtime occurs during this traffic-shift activity.
This may take a few minutes. Please be patient.
updated_endpoint_config = [
    {
        "VariantName": variantA["VariantName"],
        "DesiredWeight": 0,
    },
    {
        "VariantName": variantB["VariantName"],
        "DesiredWeight": 100,
    },
]
Exercise 8
Update variant weights in the configuration of the existing endpoint.
Instructions: Use the sm.update_endpoint_weights_and_capacities function, passing the endpoint name and list of updated weights for each of the variants that you defined above.
sm.update_endpoint_weights_and_capacities(
    ### BEGIN SOLUTION - DO NOT delete this comment for grading purposes
    EndpointName=model_ab_endpoint_name,
    DesiredWeightsAndCapacities=updated_endpoint_config
    ### END SOLUTION - DO NOT delete this comment for grading purposes
)
{'EndpointArn': 'arn:aws:sagemaker:us-east-1:227784438944:endpoint/ab-1698160602',
 'ResponseMetadata': {'RequestId': '1a3db91e-7261-474c-8561-9f3446b7b16b',
  'HTTPStatusCode': 200,
  'HTTPHeaders': {'x-amzn-requestid': '1a3db91e-7261-474c-8561-9f3446b7b16b',
   'content-type': 'application/x-amz-json-1.1',
   'content-length': '81',
   'date': 'Tue, 24 Oct 2023 15:23:57 GMT'},
  'RetryAttempts': 0}}
Wait for the ^^ endpoint update ^^ to complete above
This may take a few minutes. Please be patient.
There is no downtime while the update is applying.
While waiting for the update (or afterwards) you can review the endpoint in the AWS console.
Instructions:
- open the link
- notice that you are in the section Amazon SageMaker -> Endpoints
- check the name of the endpoint, its ARN and status (
UpdatingorInService) - below you can see the endpoint runtime settings with the updated weights
from IPython.core.display import display, HTML

display(HTML('<b>Review <a target="blank" href="https://console.aws.amazon.com/sagemaker/home?region={}#/endpoints/{}">SageMaker REST endpoint</a></b>'.format(region, model_ab_endpoint_name)))
Review SageMaker REST endpoint
waiter = sm.get_waiter("endpoint_in_service")
waiter.wait(EndpointName=model_ab_endpoint_name)
Run some more predictions and view the metrics for each variant.
This cell will take approximately 1-2 minutes to run.
%%time

for i in range(0, 100):
    predicted_classes = predictor.predict(inputs)
CPU times: user 274 ms, sys: 11 ms, total: 285 ms
Wall time: 1min 35s
Μake sure the predictions ^^ above ^^ ran successfully
If you see Metrics not yet available, please be patient as metrics may take a few minutes to appear in CloudWatch. Compare the results with the plots above.
# CPUUtilization
# The sum of each individual CPU core's utilization.
# The CPU utilization of each core can range between 0 and 100. For example, if there are four CPUs, CPUUtilization can range from 0% to 400%.
plot_endpoint_metrics_for_variants(
    endpoint_name=model_ab_endpoint_name,
    namespace_name="/aws/sagemaker/Endpoints",
    metric_name="CPUUtilization",
    variant_names=variant_names,
    start_time=start_time,
    end_time=end_time
)
# Invocations
# The number of requests sent to a model endpoint.
plot_endpoint_metrics_for_variants(
    endpoint_name=model_ab_endpoint_name,
    namespace_name="AWS/SageMaker",
    metric_name="Invocations",
    variant_names=variant_names,
    start_time=start_time,
    end_time=end_time
)
# InvocationsPerInstance
# The number of invocations sent to a model, normalized by InstanceCount in each production variant.
plot_endpoint_metrics_for_variants(
    endpoint_name=model_ab_endpoint_name,
    namespace_name="AWS/SageMaker",
    metric_name="InvocationsPerInstance",
    variant_names=variant_names,
    start_time=start_time,
    end_time=end_time
)
# ModelLatency
# The interval of time taken by a model to respond as viewed from SageMaker (in microseconds).
plot_endpoint_metrics_for_variants(
    endpoint_name=model_ab_endpoint_name,
    namespace_name="AWS/SageMaker",
    metric_name="ModelLatency",
    variant_names=variant_names,
    start_time=start_time,
    end_time=end_time
)
4. Configure one variant to autoscale
Let’s configure Variant B to autoscale. You would not autoscale Variant A since no traffic is being passed to it at this time.
First, you need to define a scalable target. It is an AWS resource and in this case you want to scale a sagemaker resource as indicated in the ServiceNameSpace parameter. Then the ResourceId is a SageMaker Endpoint. Because autoscaling is used by other AWS resources, you’ll see a few parameters that will remain static for scaling SageMaker Endpoints. Thus the ScalableDimension is a set value for SageMaker Endpoint scaling.
You also need to specify a few key parameters that control the min and max behavior for your Machine Learning instances. The MinCapacity indicates the minimum number of instances you plan to scale in to. The MaxCapacity is the maximum number of instances you want to scale out to. So in this case you always want to have at least 1 instance running and a maximum of 2 during peak periods.
autoscale.register_scalable_target(
    ServiceNamespace="sagemaker",
    ResourceId="endpoint/" + model_ab_endpoint_name + "/variant/VariantB",
    ScalableDimension="sagemaker:variant:DesiredInstanceCount",
    MinCapacity=1,
    MaxCapacity=2,
    RoleARN=role,
    SuspendedState={
        "DynamicScalingInSuspended": False,
        "DynamicScalingOutSuspended": False,
        "ScheduledScalingSuspended": False,
    },
)
---------------------------------------------------------------------------

ClientError                               Traceback (most recent call last)

<ipython-input-45-680ed7d0bbc9> in <module>
      9         "DynamicScalingInSuspended": False,
     10         "DynamicScalingOutSuspended": False,
---> 11         "ScheduledScalingSuspended": False,
     12     },
     13 )


/opt/conda/lib/python3.7/site-packages/botocore/client.py in _api_call(self, *args, **kwargs)
    533                 )
    534             # The "self" in this scope is referring to the BaseClient.
--> 535             return self._make_api_call(operation_name, kwargs)
    536
    537         _api_call.__name__ = str(py_operation_name)


/opt/conda/lib/python3.7/site-packages/botocore/client.py in _make_api_call(self, operation_name, api_params)
    978             error_code = parsed_response.get("Error", {}).get("Code")
    979             error_class = self.exceptions.from_code(error_code)
--> 980             raise error_class(parsed_response, operation_name)
    981         else:
    982             return parsed_response


ClientError: An error occurred (AccessDeniedException) when calling the RegisterScalableTarget operation: User: arn:aws:sts::227784438944:assumed-role/sagemaker-studio-vpc-firewall-us-east-1-sagemaker-execution-role/SageMaker is not authorized to perform: application-autoscaling:RegisterScalableTarget on resource: arn:aws:application-autoscaling:us-east-1:227784438944:scalable-target/* because no service control policy allows the application-autoscaling:RegisterScalableTarget action
waiter = sm.get_waiter("endpoint_in_service")
waiter.wait(EndpointName=model_ab_endpoint_name)
Check that the parameters from the function above are in the description of the scalable target:
autoscale.describe_scalable_targets(
    ServiceNamespace="sagemaker",
    MaxResults=100,
)
---------------------------------------------------------------------------

ClientError                               Traceback (most recent call last)

<ipython-input-42-1c4847dff096> in <module>
      1 autoscale.describe_scalable_targets(
      2     ServiceNamespace="sagemaker",
----> 3     MaxResults=100,
      4 )


/opt/conda/lib/python3.7/site-packages/botocore/client.py in _api_call(self, *args, **kwargs)
    533                 )
    534             # The "self" in this scope is referring to the BaseClient.
--> 535             return self._make_api_call(operation_name, kwargs)
    536
    537         _api_call.__name__ = str(py_operation_name)


/opt/conda/lib/python3.7/site-packages/botocore/client.py in _make_api_call(self, operation_name, api_params)
    978             error_code = parsed_response.get("Error", {}).get("Code")
    979             error_class = self.exceptions.from_code(error_code)
--> 980             raise error_class(parsed_response, operation_name)
    981         else:
    982             return parsed_response


ClientError: An error occurred (AccessDeniedException) when calling the DescribeScalableTargets operation: User: arn:aws:sts::227784438944:assumed-role/sagemaker-studio-vpc-firewall-us-east-1-sagemaker-execution-role/SageMaker is not authorized to perform: application-autoscaling:DescribeScalableTargets on resource: arn:aws:application-autoscaling:us-east-1:227784438944:scalable-target/* because no service control policy allows the application-autoscaling:DescribeScalableTargets action
Define and apply scaling policy using the put_scaling_policy function. The scaling policy provides additional information about the scaling behavior for your instance. TargetTrackingScaling refers to a specific autoscaling type supported by SageMaker, that uses a scaling metric and a target value as the indicator to scale.
In the scaling policy configuration, you have the predefined metric PredefinedMetricSpecification which is the number of invocations on your instance and the TargetValue which indicates the number of invocations per ML instance you want to allow before triggering your scaling policy. A scale out cooldown of 60 seconds means that after autoscaling successfully scales out it starts to calculate the cooldown time. The scaling policy won’t increase the desired capacity again until the cooldown period ends.
The scale in cooldown setting of 300 seconds means that SageMaker will not attempt to start another cooldown policy within 300 seconds of when the last one completed.
autoscale.put_scaling_policy(
    PolicyName="bert-reviews-autoscale-policy",
    ServiceNamespace="sagemaker",
    ResourceId="endpoint/" + model_ab_endpoint_name + "/variant/VariantB",
    ScalableDimension="sagemaker:variant:DesiredInstanceCount",
    PolicyType="TargetTrackingScaling",
    TargetTrackingScalingPolicyConfiguration={
        "TargetValue": 2.0, # the number of invocations per ML instance you want to allow before triggering your scaling policy
        "PredefinedMetricSpecification": {
            "PredefinedMetricType": "SageMakerVariantInvocationsPerInstance", # scaling metric
        },
        "ScaleOutCooldown": 60, # wait time, in seconds, before beginning another scale out activity after last one completes
        "ScaleInCooldown": 300, # wait time, in seconds, before beginning another scale in activity after last one completes
    },
)
---------------------------------------------------------------------------

ClientError                               Traceback (most recent call last)

<ipython-input-43-2a07e12ace31> in <module>
     11         },
     12         "ScaleOutCooldown": 60, # wait time, in seconds, before beginning another scale out activity after last one completes
---> 13         "ScaleInCooldown": 300, # wait time, in seconds, before beginning another scale in activity after last one completes
     14     },
     15 )


/opt/conda/lib/python3.7/site-packages/botocore/client.py in _api_call(self, *args, **kwargs)
    533                 )
    534             # The "self" in this scope is referring to the BaseClient.
--> 535             return self._make_api_call(operation_name, kwargs)
    536
    537         _api_call.__name__ = str(py_operation_name)


/opt/conda/lib/python3.7/site-packages/botocore/client.py in _make_api_call(self, operation_name, api_params)
    978             error_code = parsed_response.get("Error", {}).get("Code")
    979             error_class = self.exceptions.from_code(error_code)
--> 980             raise error_class(parsed_response, operation_name)
    981         else:
    982             return parsed_response


ClientError: An error occurred (AccessDeniedException) when calling the PutScalingPolicy operation: User: arn:aws:sts::227784438944:assumed-role/sagemaker-studio-vpc-firewall-us-east-1-sagemaker-execution-role/SageMaker is not authorized to perform: application-autoscaling:PutScalingPolicy on resource: arn:aws:application-autoscaling:us-east-1:227784438944:scalable-target/* because no service control policy allows the application-autoscaling:PutScalingPolicy action
waiter = sm.get_waiter("endpoint_in_service")
waiter.wait(EndpointName=model_ab_endpoint_name)
Generate traffic again and review the endpoint in the AWS console.
This cell will take approximately 1-2 minutes to run.
%%time

for i in range(0, 100):
    predicted_classes = predictor.predict(inputs)
Review the autoscaling:
- open the link
- notice that you are in the section Amazon SageMaker -> Endpoints
- below you can see the endpoint runtime settings with the instance counts. You can run the predictions multiple times to observe the increase of the instance count to 2
from IPython.core.display import display, HTML

display(HTML('<b>Review <a target="blank" href="https://console.aws.amazon.com/sagemaker/home?region={}#/endpoints/{}">SageMaker REST endpoint</a></b>'.format(region, model_ab_endpoint_name)))
Upload the notebook into S3 bucket for grading purposes.
Note: you may need to click on “Save” button before the upload.
!aws s3 cp ./C3_W2_Assignment.ipynb s3://$bucket/C3_W2_Assignment_Learner.ipynb
upload: ./C3_W2_Assignment.ipynb to s3://sagemaker-us-east-1-227784438944/C3_W2_Assignment_Learner.ipynb